T-Rex Runner - Machine Learning Bot Created Using a Convolutional Neural Network
Tools used: Python 3, TensorFlow/ Keras, Numpy and Jupyter Notebook
Abstract
Using image data, we aim to train a bot which can play the game 'T-Rex Runner'. T-Rex Runner is a 2D browser game which has 1 input, which is to jump (space). The player has to jump over each obstacle. The longer the player survives, the more points are achieved.
The goal of this project is to achieve at least 500 points with our bot.

Requirements
There are a few Python 3 packages requried for this project:
- pip install keras - Keras is a high-level API which sits on top of TensorFlow. This will be used to create, train and test our Neural Network.
- pip install tensorflow - even though we are using Keras, TensorFlow will still be required to run in the background.
- pip install numpy - we'll be using NumPy to format our data to be compatible with the Neural Network and various other reasons.
- pip install jupyterlab (Optional) - Jupyter Notebook will be our coding environment of choice, allowing us to structure our code and functions more easily.
getkeys.py, directkeys.py, keys.py and grabscreen.py - we will be using these files to record and our button presses and also send button comands through Python. grabscreen.py is what we will be using to record our gameplay, as we will be using image data for our Neural Network (explained later).
The 4 custom files above were created by Harrison Kinsley and all can be downloaded from here.
Process Outline
Some of the unique challenges for this project are:
- Recording our pixel data - T-Rex Runner is a standalone game which does not have an API to interect with through Python. Here, we will be using PyWin32 and OpenCV to record the game. Our data for this project will revolve around this screen recording (image data).
- Interacting with the game through Python (recording features and labels) - Our features will be the screen recording (pixels). For the labels, we will be recording our keyboard inputs, using getkeys.py. We will also need to be able to output keyboard button presses through Python. directkeys.py will help with this.
Our step-by-step process will be:
- Record input data to train our model
- Sort, clean, balance and format our input data
- Create our Convolutional Neural Network
- Test our model
- Implement custom algorithms to improve accuracy
1) Record input data to train our model
As mentioned above, the first step we need to go through is to record our input data.
Here, we will be recording the screen using grabscreen.py and saving each frame as an array.
We will also be recording our 'space' button presses using getkeys.py, which will be our labels. For each frame recorded, the label will either be a 'no key press' or a 'space press'.
While recording, I will manually be playing the game. My goal is to get at least 50,000 frames recorded. This will give us a good training set to start with.
Let's import what we need for this script:
import numpy as np
import cv2
import time
import os
from getkeys import key_check
from grabscreen import grab_screen
Our first function will check which button on our keyboard is being pressed. Here, we want to check for space presses. This function will be called everytime we cycle through a frame, to check if anything is being pressed.
Our 2 possible outputs will be saved as one-hot arrays (space = [1,0], nk = [0,1]). We also have a short wait time after a button is pressed. This prevents 'double presses'.
space = [1, 0]
nk = [0, 1]
key_wait_time = 0.07

def output_keys(keys):
    if ' ' in keys:
        output = space
        time.sleep(key_wait_time)
    else:
        output = nk

    return output
Now we need to start our main loop. Here, we use a while loop. To start, we print out a count down to help us prepare to play and setup some variables.
def start_recording(file_name, starting_value):
training_data = []
last_time = time.time()
paused = False
for i in list(range(3))[::-1]:
print(i+1)
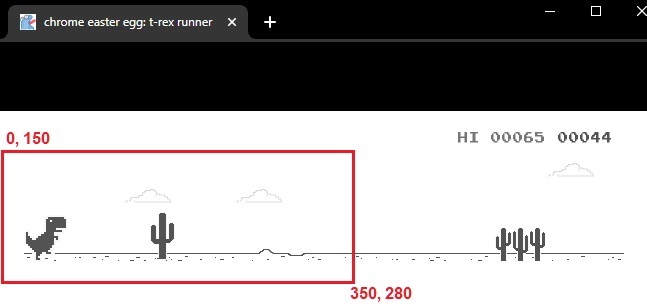
time.sleep(1)and now startup the loop. For each loop, we call grab_screen, which takes in our recording dimensions. To find the dimensions you need, MS pain can be of use. Simply take a print-screen, paste into MS paint, and use your cursor to find the coordinates for your screen recording:
I'm using coordinates 0, 150 to 350, 280. This will allow me to only record the part of the game which I need.
Each loop for our recording will call key_check() from getkeys.py, and send this through our output_keys() function. The screen and output data will be added to our training_data.
print("Recording Started")

while(True):
    screen = grab_screen(region=(0, 150, 350, 280))
    last_time = time.time()

    # resize the image if you want your data-size to be smaller.
    # screen = cv2.resize(screen, (200, 144))

    screen = cv2.cvtColor(screen, cv2.COLOR_BGR2GRAY)
    keys = key_check()
    output = output_keys(keys)
    training_data.append([screen, output])

    # show our recording for debugging purposes. Comment cv2.imshow out when
    # recording your main set as this can help with your frames per second
    cv2.imshow('T-Rex Dino Recording', screen)

    print(f"{output}, {len(training_data)}, iteration took {(time.time()-last_time)} seconds")
    last_time = time.time()

    # this is here to keep cv2 happy with our cv2.imshow().
    # This will not stop the recording, but stop the image output instead (don't use)
    if cv2.waitKey(25) & 0xFF == ord('q'):
        cv2.destroyAllWindows()
        cv2.waitKey(1)
        break
Finally, we need to be able to stop our recording when we are happy with our sample size. We use key_check again to record a stop button ('T', in this case). When this is pressed, the loop will break and then we can save our training data to a NumPy array file.
    keys = key_check()
    if 'T' in skeys:
        if paused:
            print("Recording finished")
            break
np.save("training_data_dino.npy", training_data)Now we have our training data, ready to be cleaned up!
2) Sort, clean, balance and format our input data
The first issue with our dataset is sometimes our recorded 'space' inputs would have been recorded more than once in a row. In T-Rex Runner, you only need to press space once at a time. So let's remove those first. We also want to split our space_data and no_key data:
def clean_data():
    space_data = []
    nk_data = []
    training_data = np.load('training_data_dino.npy', allow_pickle=True)

    for row_indx, row in enumerate(training_data):
        img = row[0]
        if row[1] == [1, 0]:
            ''' skip if multiple spaces in a row '''
            if training_data[row_indx-1][1] != [1, 0]:
                space_data.append((img, row[1]))
        elif row[1] == [0, 1]:
            nk_data.append((img, row[1]))
        else:
            pass
Now that we have space_data and nk_data split, we want to make sure they are the same size. We already know space_data will be far smaller, as this only includes outputs where I pressed the space bar.
Here, I set the length of each list to the length of the space_bar list, therefore removing any extra data from [no_key].
space_data, nk_data = space_data[:len(space_data)], nk_data[:len(space_data)]Finally, we can combined both lists, shuffle them up and save them as a NumPy array.
full_data = space_data + nk_data
random.shuffle(full_data)
full_data = np.array(full_data)
np.save('training_data_dino_cleaned', full_data)
3) Creating our Convolutional Neural Network
To start, let's import our data and setup our training data. Here, we get the width and height of our image data, and set them aside as variables. Then we can split up our features and labels.
For our features, we use the reshape method to reshape the axis in our input data to be compatible with our network.
Finally, we divide our X (features) by 255. This converts our input data to a number between 0 and 1, allowing our network to better interpret each feature.
import tensorflow as tf
from tensorflow.keras.models import Sequential
from tensorflow.keras.layers import Dense, Activation, Flatten
from tensorflow.keras.layers import Conv2D, MaxPooling2D
from tensorflow.keras.callbacks import TensorBoard
import numpy as np

train_data = np.load('training_data_dino_cleaned.npy', allow_pickle=True)

WIDTH = train_data[0][0].shape[1]
HEIGHT = train_data[0][0].shape[0]

X = np.array([i[0] for i in train_data]).reshape(-1, HEIGHT, WIDTH, 1) / 255
Y = np.array([i[1] for i in train_data])
print(X.shape, Y.shape)
(1126, 156, 651, 1) (1126, 2)
For our Convolutional Neural Network, there are countless structures we can try. After testing a few different models, as well as different input sizes, I found the following to work the best:
EPOCHS_N = 15
model = Sequential()
NAME = "DINO-GAME-{}x{}-{}EPOCHs-0-Dense-refined-data.model".format(WIDTH, HEIGHT, EPOCHS_N)

model.add(Conv2D(200, (3, 3), input_shape=X.shape[1:]))
model.add(Activation('relu'))
model.add(MaxPooling2D(pool_size=(2, 2)))

model.add(Conv2D(500, (3, 3)))
model.add(Activation('relu'))
model.add(MaxPooling2D(pool_size=(2, 2)))

model.add(Conv2D(500, (3, 3)))
model.add(Activation('relu'))
model.add(MaxPooling2D(pool_size=(2, 2)))

model.add(Conv2D(500, (3, 3)))
model.add(Activation('relu'))
model.add(MaxPooling2D(pool_size=(2, 2)))

model.add(Flatten())

# final output layer
# we have 2 outputs for our task (no_key or space_bar)
model.add(Dense(2))
model.add(Activation('sigmoid'))
For this project, I found TensorBoard to be useful. This will help track differnet models I've made, so we can see which ones did the best.
tensorboard = TensorBoard(log_dir="logs/{}".format(NAME))

model.compile(loss='categorical_crossentropy',
            optimizer='adam',
            metrics=['accuracy'])

model.fit(X, Y, batch_size=15, epochs=EPOCHS_N,
        validation_split=0.1, callbacks=[tensorboard])
After 15 epochs, we achieved a low loss, resulting in over 99% accuracy. Don't be fooled by the high accuracy figure, there is still lots of improvements to be made.
Epoch 12/15
68/68 [==============================] - 14s 210ms/step - loss: 0.0200 - accuracy: 0.9939 - val_loss: 0.0052 - val_accuracy: 1.0000
Epoch 13/15
68/68 [==============================] - 14s 209ms/step - loss: 0.0177 - accuracy: 0.9948 - val_loss: 0.0080 - val_accuracy: 1.0000
Epoch 14/15
68/68 [==============================] - 14s 211ms/step - loss: 0.0198 - accuracy: 0.9898 - val_loss: 0.0332 - val_accuracy: 0.9823
Epoch 15/15
68/68 [==============================] - 14s 205ms/step - loss: 0.0142 - accuracy: 0.9946 - val_loss: 0.0157 - val_accuracy: 0.9912model.save(NAME)With TensorBoard, we can checkout how the other models performed. Open command prompt (aka terminal), and type:
tensorboard --logdir=logs/There are 4 main models which I tested, each with slightly different data, layer structure or epoch length.
- DINO-GAME-651x156-10EPOCHs-0Dense.model - larger image recording window (whole game, 651x156), 10 epochs and 0 dense layers.
- DINO-GAME-651x156-15EPOCHs-0-Dense-refined-data.model - larger image recording window (whole game, 651x156), multiple-space input data removed, 15 epochs and 0 dense layers.
- DINO-GAME-351x131-10EPOCHs-0-Dense-CutScreenData.model - smaller image recording window (half the game cut-off, 351x131), 10 epochs and 0 dense layers.
- DINO-GAME-351x131-15EPOCHs-2-Dense-CutScreenData.model - smaller image recording window (half the game cut-off, 351x131), 15 epochs and 2 dense layers.
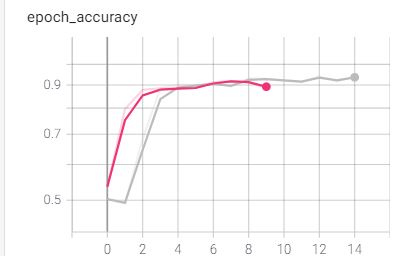
Both models with smaller image data performed similarly. After the 4th epoch, the models plateaued in loss and accuracy. The model with 15 epochs (grey) also had 2 dense layers, however this didn't impact performanced.
Smaller models (recording window cut in half to focus on the T-Rex).
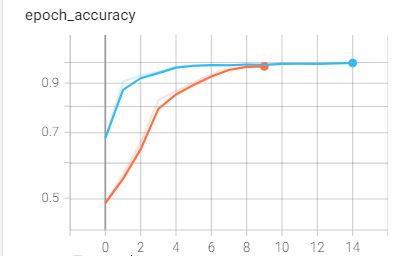
The models with the larger image data both performed similarly. This time, it took slightly longer (5th epoch) for the accuracy to plateau. The refined dataset (blue) used the refined dataset, which seemed to impact the early stages of training. At the 15th epoch, this dataset performed the best.
Larger models (full recording window capturing whole game).
Looking at all four models, it's clear that having the extra epochs doesn't affect things too much, except for increasing training time.
A final improvement we can make at this stage is to increase our input data size, however I've satisfied with the accuracy we have already.

4) Testing our model
It's finally time to put our model to the test. Let's start by importing our modules and setting our game width and height, as well as our image width and height (same ones used from our training data).
import cv2
import time
import numpy as np
import tensorflow as tf
from grabscreen import grab_screen
from getkeys import key_check
from directkeys import PressKey, ReleaseKey, SPACE

GAME_WIDTH = 650
GAME_HEIGHT = 280
WIDTH = 651
HEIGHT = 156
directkeys.py allows us to send inputs, via Python, to our operating system. Here, we can define our space input through a function.
def space():
    PressKey(SPACE)
    ReleaseKey(SPACE)
Let's start our run function similar to how we did it for our data collection script:
def run_model():
    last_time = time.time()
    for i in list(range(1))[::-1]:
        print(i+1)
        time.sleep(1)

    paused = False
    prediction_choice = 0
    loop_counter = 0
    screen = grab_screen(region=(0, 125, 650, 280))

    while(True):
    if not paused:
        loop_counter += 1
        last_time = time.time()
        screen = grab_screen(region=(0, 125, 650, 280))
        screen = cv2.cvtColor(screen, cv2.COLOR_BGR2GRAY)
        screen = cv2.resize(screen, (WIDTH, HEIGHT))
        # cv2.imshow('window', screen)

        if cv2.waitKey(25) & 0xFF == ord('q'):
            cv2.destroyAllWindows()
            cv2.waitKey(1)
            break

        screen = screen.reshape(-1, HEIGHT, WIDTH, 1)
Now that we have our screen (frame) formatted, we can send it through our model using model.predict()
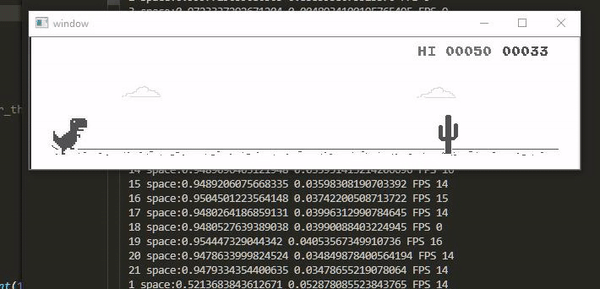
prediction = model.predict([screen])[0]Our prediction will be a NumPy array with 2 values. The 0ith index represents our 'space' output and the 1st'th' index represents no key presses.
'''0 indx argmax == space ([1, 0])
1 indx argmax == no_key ([0, 1])'''
prediction_choice = np.argmax(prediction)
Let's try and see how this performs.
if prediction_choice == 1:
    choice_picked = 'space'
    space()
elif prediction_choice == 0:
    choice_picked = 'no_key'
    pass
print(f'{loop_counter} {choice_picked}:{prediction[0]} {prediction[1]} FPS {int(1/(time.time()-last_time))}')

keys = key_check()

#  pressing T will pause our script, allowing us
#  to reset the game manually on death
if 'T' in keys:
    if paused:
        paused = False
        loop_counter = 0
    else:
        paused = True
        ReleaseKey(SPACE)
    time.sleep(0.2)
After a few test runs, I found that our dino bot is a little too excited to play and keeps jumping!
We clearly need to make some tweaks to our output if we want to achieve 500 points!
5) Implementing custom algorithms to our model
Altough our model is not performing as intending, don't underestimate it's power.
Our model is able to understand different frames, based on the accuracy and loss we saw early. The model simply needs to be pointed in the right direction.
After inspecting our output data with more detail, we need to set a threshold for our space (index 0) output. If the model doesn't go over that threshold, then we simply perform a no_key input.
We can also set a threshold on the no_key prediction at the same time. If our model predicts no_key at a certain percentage, and also predicts 'space' at a high percentange, only then we will perform a space, otherwise we won't perform an aciton.
if prediction[0] > 0.4 and prediction[1] < 0.86:
    choice_picked = 'space'
We also want to limit the number of 'space' predicts. We only need to press it once at a time, so here we can set a stagger to pause space inputs for the next 6 frames after a space input is performed.
space_stagger = 0
stagger_iterations = 6
if prediction[0] > 0.4 and prediction[1] < 0.86 and loop_counter >= space_stagger:
choice_picked = 'space'
space_stagger = loop_counter + stagger_iterations
else:
choice_picked = 'no_key'
if loop_counter >= stagger_iterations and choice_picked == 'space':
space()The longer the game goes, the faster our T-Rex will run, reducing the reaction time our model has to perform a jump.
Here, we need to make sure our jump stagger time gradually reduces the longer the game goes on for:
if loop_counter == 130:
    stagger_iterations = 4
elif loop_counter == 250:
    stagger_iterations = 3
elif loop_counter == 300:
    stagger_iterations = 2

print(f"Updating stagger to {stagger_iterations}")
Finally, we need to set an extra threshold for our output percentages. I found that sometimes the game would be unsure whether or not to jump over the flying birds, or to simply run underneath them.
Here, if our first IF statement threshold don't fire, we can lower the threshold for our no_key prediciton. If no_key is prediction with less than 50% certainty, we will perform a jump, otherwise, we can keep running:if prediction[0] > 0.4 and prediction[1] < 0.86 and loop_counter >= space_stagger:
choice_picked = 'space'
space_stagger = loop_counter + stagger_iterations
elif mode_choice == 0 and prediction[mode_choice] >= space_trigger_threshold and loop_counter >= space_stagger and prediction[0] > 0.25 and prediction[1] < 0.5:
choice_picked = 'space'
space_stagger = loop_counter + stagger_iterations
else:
choice_picked = 'no_key'Final Solve - 500 Points!
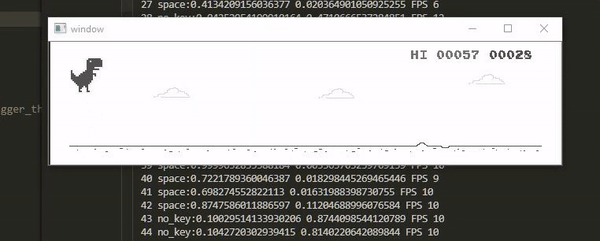
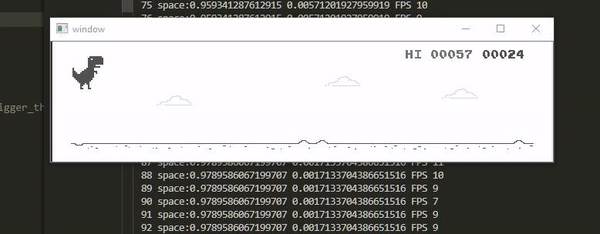
With this, we can put our Neural Network model to full use. After getting a bunch of highscores, I finally made the run to pass 500 points!